
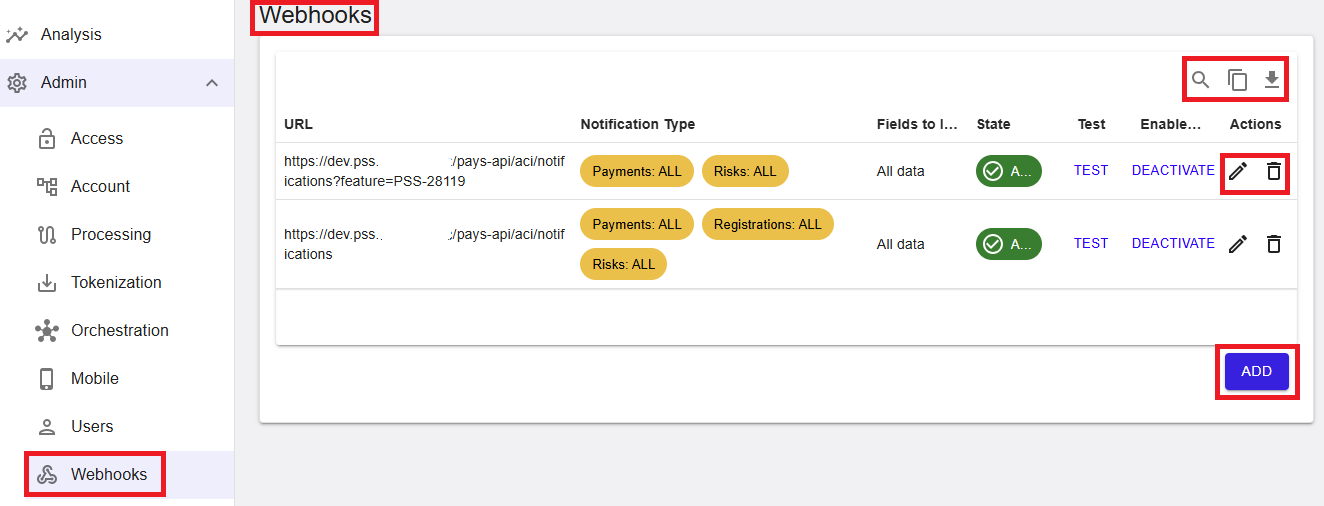
Webhooks
The Webhooks configuration section allows you to set up and manage webhook listeners that receive real‑time notifications for events occurring in the Merchant Portal and the Payment Orchestration Platform.
Webhooks are accessible by navigating to Administration → Webhooks. By selecting the desired entity in the account tree, the list of webhook listeners currently configured for that entity is displayed.
Figure 1: Admin – Webhooks overview
Where to find this screen
- In the left navigation menu, select Admin.
- Select Webhooks.
Webhooks List
The webhook listeners are specific to the currently selected entity in the account tree.
The Webhooks list displays all webhook listeners configured for the selected entity. Each row represents a listener and provides an overview of where notifications are sent and which event types are delivered.
The following information is provided for each listener:
- URL – The endpoint URL that will receive webhook notifications. The URL must be exposed over HTTPS to ensure secure delivery.
-
Notification Type – Select the categories of notifications
the listener should receive.
Notification types are grouped into:
- Payment – Payment-related events (for example, PA, DB).
- Registrations – Registration-related events.
- Schedules – Events related to subscription or scheduling processes.
- Risk – Risk and fraud-related events.
-
Fields – Specify which fields to include in the notification payload.
This allows control over the data shared for compliance purposes. The selected field option affects only the content of the notification payload and does not change the structure of the webhook notification itself.
- All Fields – Includes all available data fields.
- No Customer Data – Excludes customer-related data from the payload to support privacy and GDPR compliance.
- State – The current state of the listener (active or inactive).
- Test – Allows sending a test notification to the listener.
- Enablement – Displays the available activation or deactivation action.
- Actions – Edit and delete options for the webhook listener.
Additional features available directly from the webhook list include Copy to Clipboard, which copies the full list of configured webhooks, and Export to CSV, which downloads the list as a file.
View Webhooks List
To view webhook listeners, navigate to Administration → Webhooks and select the desired entity in the account tree.
Each entry in the table displays the listener URL, notification type, field configuration, current state, and available actions.
Add New Webhook
To add a new webhook listener, select Add. A configuration form opens in a pop‑up dialog.
The following fields must be configured:
- URL – The endpoint URL of the receiving system that will receive webhook notifications.
- Notification Type – Select the categories of notifications the listener should receive. Available categories are Payment, Registrations, Schedules, and Risk. Individual notification types can be selected by typing the name and choosing from the list, or all notification types can be enabled at once using Select All.
-
Fields – Specify which fields to include in the notification payload:
- All Fields – Includes all available data fields.
- No Customer Data – Excludes customer data from the payload.
- Wrapper – Select the encryption wrapper for the notification payload. Available options are No Wrapper and JSON Wrapper.
- Secret – An auto‑generated value used to decrypt encrypted webhook payloads on the listener side. The decrypted payload corresponds to the payload returned by the transaction status API. To consume encrypted webhook payloads, the receiving system must implement decryption logic using the provided secret. Refer to the Webhooks Guide for details on how to use this value.
- Alert Email Addresses – Optionally specify one or more email addresses to be notified if webhook delivery repeatedly fails after retry attempts.
Select Add to save the configuration and create the new webhook listener.
ℹ️ Note: Newly created webhook listeners are set to Inactive by default. The listener must be activated before it starts receiving notifications.
Test Webhook
To send a test notification to a listener, select Test on the corresponding row in the webhook list.
A test notification is sent to the configured listener URL, and the headers returned by the listener are displayed in a response dialog. This allows you to verify that the listener is reachable and responding correctly before activating it.
A successful test requires the listener endpoint to return a valid response, confirming that it can receive and acknowledge notifications.
Testing can also be performed using external tools or temporary endpoints to validate payload delivery and response handling before enabling the webhook.
ℹ️ Note: It is recommended to verify webhook functionality before activation to ensure the receiving system correctly processes and acknowledges notifications, avoiding repeated retries.
Activate and Deactivate Webhook
To activate a webhook listener, select Activate in the enablement column of the corresponding row.
As part of the activation process, a test notification is sent to the listener. If the listener responds successfully to the test notification, the webhook is activated and begins receiving notifications. If the test fails, the webhook remains inactive. The returned headers are displayed for verification.
To deactivate an active webhook listener, select Deactivate. The listener stops receiving notifications until it is reactivated.
Edit Webhook
To edit an existing webhook listener, select Edit from the action menu on the right of the corresponding row.
The configuration dialog opens pre‑filled with the current settings. Update the required fields and select Save to apply the changes.
Delete Webhook
To delete a webhook listener, select Delete from the action menu on the right of the corresponding row.
⚠️ Warning: Deleting a webhook stops all notifications to the configured endpoint and may impact downstream systems that rely on these events.
Webhook Retry Logic
If the receiving system does not acknowledge a webhook notification, the platform automatically retries delivery using increasing intervals.
Retries occur with progressively longer delays (for example, 1 minute, 2 minutes, 4 minutes, and increasing thereafter) and may continue for up to 30 days.
If delivery continues to fail, a notification email is sent to the configured Alert Email Addresses.
⚠️ Warning: Repeated failures may result in delayed notification delivery due to retry scheduling.
Summary
The Admin → Webhooks section provides a centralized way to configure and manage real‑time event notifications. By using webhook listeners, merchants and PSPs can integrate payment, risk, registration, and scheduling events into their own systems, supporting automation, monitoring, and near real‑time processing.