
User Management
The User Management section is used to manage user accounts that have access to the Merchant Portal. It is accessible by navigating to Administration → Users.
By selecting the desired entity in the account tree, the complete list of users available at that level is displayed. Users are created and subsequently assigned to entities. When a user is assigned to a specific entity, they gain access to that entity and to all entities and channels below it in the hierarchy.
⚠️ Important: All user management actions depend on the selected level in the account tree. The list of users, available actions, and assignment scope are determined by the currently selected entity.
Note: In the new portal, the term assigned replaces attached used in previous versions.
The portal is optimized to handle large user lists efficiently, ensuring fast load times even for entities with a high number of users.
Figure 1: Admin – Users overview
Where to find this screen
- In the left navigation menu, select Admin.
- Select Users.
Users List
The Users list displays all users configured for the selected entity. Each row represents a single user account and shows key attributes that define access and permissions.
The user table contains both users created at the selected level and users assigned to the selected level. This replaces the separate available and attached sections used in previous versions.
The user list provides the following information:
- Name – The unique display name of the user.
- Email – The email address associated with the user.
- Type – The user type. Available types are: Send, Motto, Web API, OAuth App, and Automation.
- Role – The role assigned to the user. Available roles include: Administrator, Operator, Call Center, Analysis, Accounting Global, Account Access, and Call Center Restricted. User access is controlled through roles and assignments. Additional access control features may further refine permissions based on organizational needs.
- Created At – The date and time the user was created.
- State – The current state of the user: New, Active, or Locked.
- Status – The current operational status of the user.
Additional columns can be shown or hidden by clicking the Show / Hide Columns icon in the user list and toggling the desired values. Column headers can be used for sorting, where available.
Columns can be sorted where available. Sorting behavior may vary depending on the field.
Export Users
The user list can be exported to a CSV file for reporting or compliance purposes.
- Exports all users visible for the selected entity.
- Includes core user attributes such as name, email, role, and state.
⚠️ Note: The export does not include detailed assignment information for each user.
User Status
The Status and State columns provide a clear indicator of the user’s current access level.
- NEW – The user has been created but has not completed initial access steps.
- ACTIVE – The user can log in and access the portal according to assigned roles.
- LOCKED – The user account is locked and cannot log in.
Note: Locked users can only be unlocked by an administrator from within the portal. Self-service unlock is not supported.
User Actions
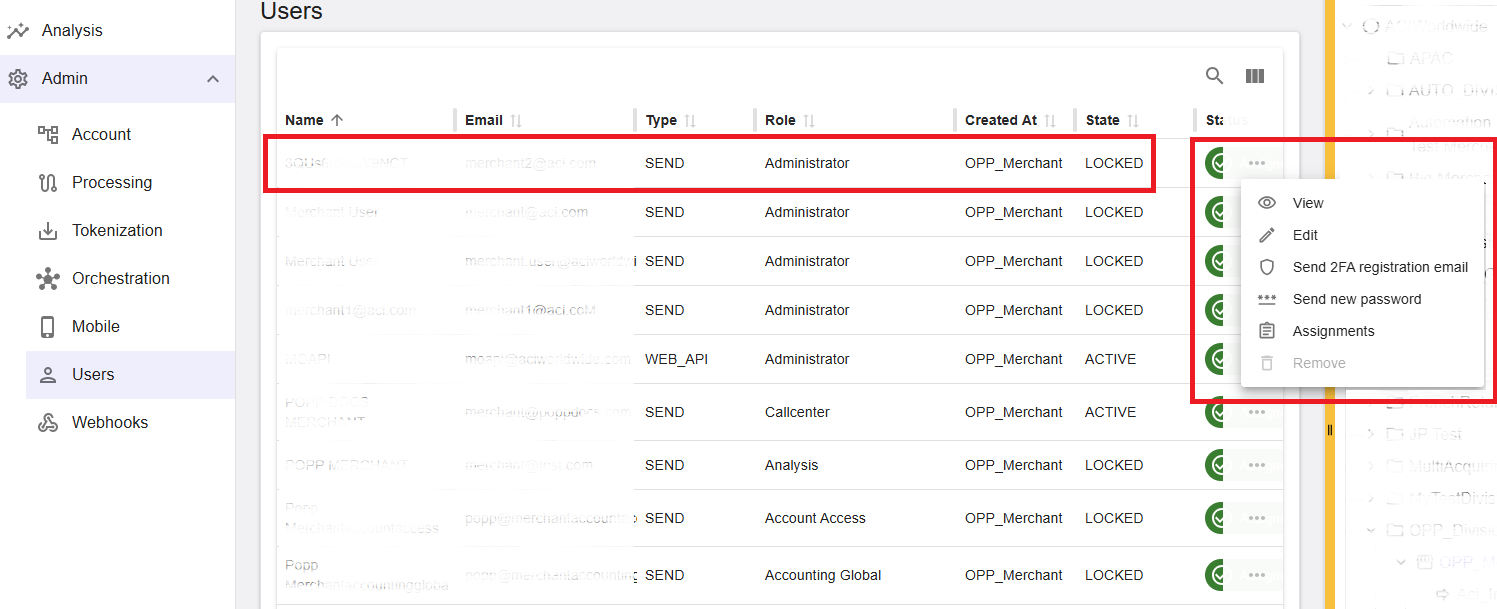
Each user row includes an action menu (three vertical dots) that provides context-specific actions. Availability of actions depends on user state and permissions.
Figure 2: User actions menu
Common actions include:
- View – Opens the user details in read-only mode.
- Edit – Opens the user for editing.
- Send MFA registration email – Sends a multi-factor authentication registration email.
- Send new password – Generates and sends a new password to the user.
- Assignments – Displays the entities to which the user is assigned.
- Remove – Removes the user, where permitted.
Add a New User
To create a new user, click Add in the user list. A dialog appears prompting you to complete the user creation form.
The following fields are required:
- Name – Must be unique.
- Email – Must be unique per entity.
- State – Typically set to New for newly created users.
- Type – Select the appropriate user type.
- Role – Select the appropriate role.
- Entity Assignment – Select the entity or entities to which the user will be assigned. The user gains access to the selected entity and all entities and channels below it.
The following fields are optional:
- Phone
- Mobile Phone
- Description
Click Save to create the user and assign them directly to the selected entities.
After creation, the user receives:
- A password email for initial login.
- A MFA registration email to configure authentication.
The user is required to complete authentication setup and define a new password during the first login.
Passwords are not displayed in the portal UI. A system-generated password is sent to the user via email for security reasons.
If a user is assigned to multiple entities, they are prompted after login to select which entity to access.
Send MFA Authentication Email
To send a multi-factor authentication registration email, select Send MFA Registration Email from the action menu of the corresponding user row.
The system sends the MFA registration email to the email address specified during user creation.
For more details on multi-factor authentication setup and usage, see Multi-Factor Authentication (MFA).
Send New Password
To send a new password to a user, select Send New Password from the action menu.
The system generates a new password and sends it to the email address specified during user creation.
Passwords are not displayed in the portal UI. A system-generated password is sent to the user via email for security reasons.
⚠️ Important: When a new password is sent, the user’s state automatically reverts to New.
View User Details
To view user details, select View from the action menu. A dialog opens displaying the full user details in read-only mode.
View Assignments
To view the entities assigned to a user, select Assignments from the action menu. A dialog opens listing all entities to which the user is currently assigned.
If a user is assigned to multiple entities, they are prompted after login to select which entity to access.
Edit Existing User
To edit a user, select Edit from the action menu. The dialog opens pre-filled with the user’s current information.
You can update any user details, including assigning the user to additional entities. Click Save to apply the changes.
Remove User
To remove a user, select Remove from the action menu. Users can only be removed after all assignments have been removed. Validation is enforced at system level to prevent accidental deletion.
⚠️ Warning: Removing a user is a permanent operation. Ensure the user no longer requires access before proceeding.
Summary
The Admin → Users section provides centralized user management for the Merchant Portal. It allows administrators to create users, assign access across the entity hierarchy, manage authentication and passwords, export user information, and control user lifecycle actions in accordance with assigned permissions and security policies.