
Merchant Onboarding API Quick Start Guide
Last updated: November 5, 2026
Merchant Onboarding API › Quick Start Guide
API Reference
Introduction
The section describes the Merchant Onboarding API.
Hosts
Security
All requests must be sent over SSL. IP whitelisting is not required.
Throttling
Throttling rules apply to the following endpoints:
| Method | Endpoint | Max count |
|---|---|---|
| GET | /webapi/v1/merchantAccounts/{merchantAccountId}/onboard/{partnerId} | 6 / Minute |
| POST | /webapi/v1/merchantAccounts/{merchantAccountId}/fileTransfer | 1 / Minute |
| GET | /webapi/v1/merchantAccounts/* | 10 / Second |
Limitations
When creating, deleting or changing an entity or configuration in Open Payment Platform via the onboarding API you require to wait for a couple of seconds up to 3 minutes so that the change is reflected accordingly. The reason for the waiting period is due to a caching mechanism activated to speed up transaction processing when handling all the configuration performed by the customer. Any follow up onboarding API request is requiring to consider the waiting period.
Authentication
Contact us to enable the Merchant Onboarding API!
In addition, the API is secured by REST API security.
- The user must provide valid credentials (username and password) for every request.
- These credentials are looked up in the contact list of the requested entity and in the contact list of the parent entities.
- For all operations at the entity level, the contact must be of the kind WEB_API. Otherwise, it will be rejected with an error message.
- For all operations at the contact level, the request must be sent from a valid WEB_API contact with an ADMINISTRATOR role.
Versioning
The API version is indicated in the request URL, in /webapi/v1/merchants it is version 1.
All changes made to the API are backward compatible. Major features that could break existing implementations will be released using a new version.
Encoding
The system expects data to be sent encoded in UTF-8.
Using this Content-Type header can help:application/x-www-form-urlencoded; charset=UTF-8
Request header attributes
| Name | Value |
|---|---|
| accept | application/json |
| credentials | username:password |
Successful response header field
LocationHTTP status codes
200 - Successful request
307 - Temporary redirect
400 - Bad request
403 - Incorrect authentication information
404 - Requested resource or endpoint is not found (i.e. endpoint/URL does not exist)
Guidelines to meet our Security Standards for Merchant Onboarding webAPI
According to the Merchant onboarding API documentation, the API is secured by REST API Security. Follow the documented instructions on how to securely use the API and refer to the following security concerns to know if you need to take any immediate action:
| What is the security concern? | What action the customer must take? | What we will do? |
|---|---|---|
|
| Immediately:
|
|
| Immediately:
|
Quick Start Guide for Open Payment Platform with links to moAPI calls
The Quick Start Guide describes the typical sequence of actions a new PSP would do when setting up and configuring its Open Payment Platform.
Each step can be used by existing PSPs who completed their setup and configuration as standalone use cases for specific tasks.
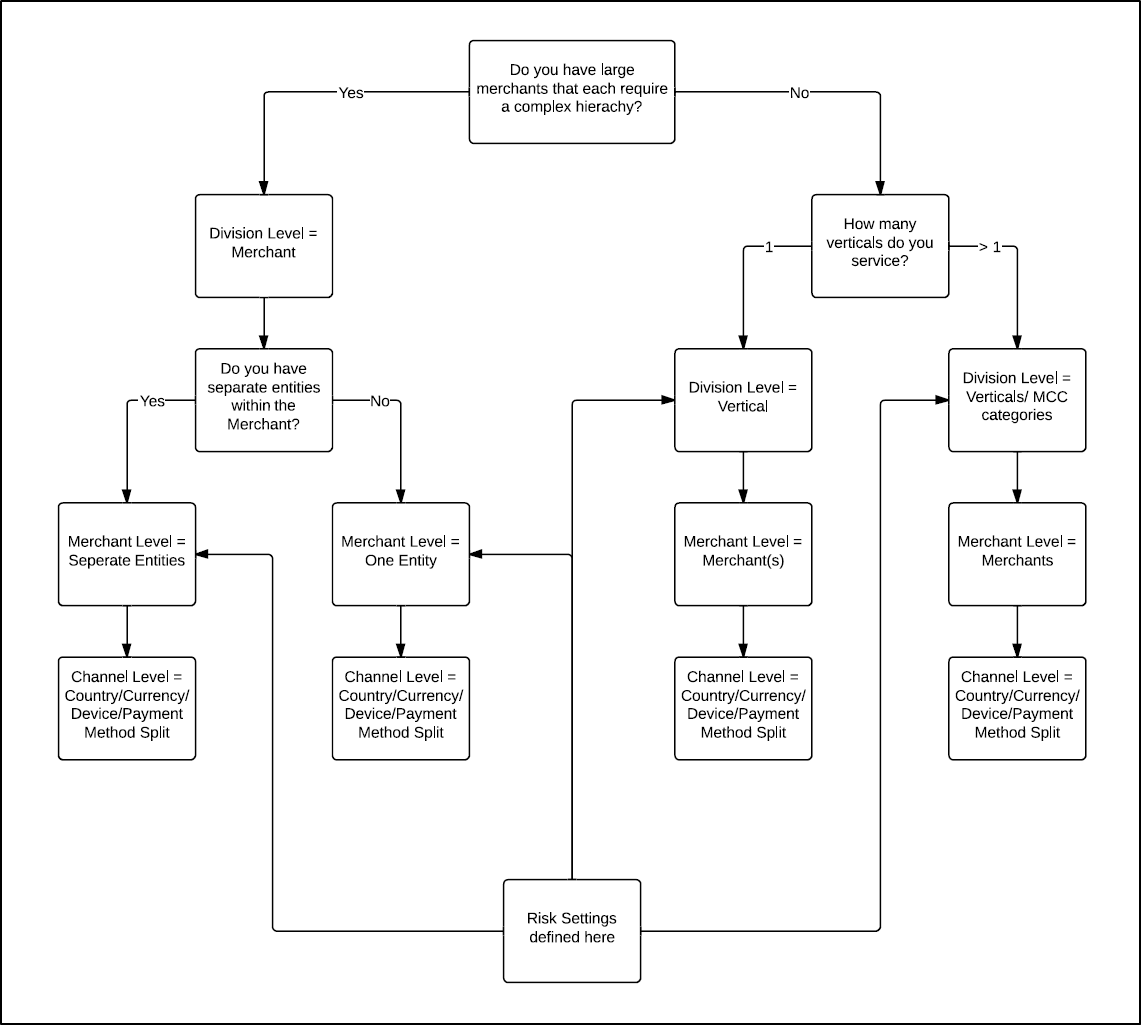
Step 1. Structure the Open Payment Platform.
Use the following Open Payment Platform Structure Decision Flow to define the Open Payment Platform structure that fits your needs:
Step 2. Create the PSP Contacts on the PSP level (executed by our Support team).
a. Click contacts under Administration icon.
b. Click create contact at the PSP level.
c. Attach contact at the PSP level.
d. Send out the password
Log out and switch control to a PSP user at this point.
Step 3. Create new divisions, merchants, and channels in Open Payment Platform.
This setup will be based on the results of Step 1.
a. Create new Division
b. Create new Merchant
c. Create new Channel
Step 4. Create new Merchant Contacts in Open Payment Platform and define their user rights.
Make sure you understand the difference between owned and attached contacts.
The contacts that were created at the level of a specific entity in Open Payment Platform are the owned contacts, and they can be attached to a different entity. The contacts that were attached to a specific entity were not necessarily created at the same hierarchy level.
a. Identify the appropriate entity (Division/Merchant level) and save its details to use in the next calls.
b. Create new contacts.
c. Attach contact at the desired hierarchy level.
d. Set the password for the contact.
Step 5. Add Connectors (Acquirers or Payment Providers).
- For an existing connector, complete a Connector Order Form and send it to contact@aciworldwide.com.
- For a new connector that is not integrated, provide the technical documentation and a contact person. We will estimate the work and provide a Connector Request Form.
- In the Merchant Onboarding API, the connector operations are managed using the Clearing Institute calls.
a. List the available clearing institutes
b. Check how to set up a Merchant Account for the chosen clearing institutes: Merchant Account Configuration by Clearing Institute and the Configuration Sheets for the corresponding connectors.
Step 6. Create Merchant Accounts in Open Payment Platform for your Merchants.
- The Merchant and Channel Entities are empty shells for hierarchy purposes.
- Available Merchant Accounts contain the contract data, such as the MID or various credentials or terminal numbers, and should be created on the Merchant Entity Level.
- Attached Merchant Accounts contain the processing settings such as card brands and processing currencies and should be attached to the Channel Entity Level.
a. Talk to your Acquirer to get an MID and other required data.
b. List your merchants and save the data to use in the next calls.
c. Add Merchant accounts as appropriate, using the configuration data received from the Acquirer, as well as the guidance from the Configuration sheets and the Merchant Account Configuration by Clearing Institute page.
Step 7. Attach the created Merchant Accounts in Open Payment Platform to Channels
a. List your channels and save the data for use in the next steps.
b. List your merchant accounts and save the data to use in the next calls.
c. Attach the desired merchant account to the desired channel with the desired processing details (country/currency/cards/brands/descriptor etc.)
Step 8. Add new payment methods, which were not part of the initial setup
a. Fill out the Connector Order Form.
b. Send it to contact@aciworldwide.com.
c. The Clearing Institute will be enabled for you.
d. To configure the connector, use the ‘Connector_name Configuration Sheet’ and the ‘Connector_name Integration Sheet’ from Confluence and repeat step 6.